Overview
With the help of the premium plugin WPML, Print My Blog (PMB) can be used to create books and documents in multiple languages.
The Basics of How WPML Works
WPML can either automatically translate entire posts for you, or let you manually translate them line-by-line, or do a mix of the two (automatically translate and then let you tweak those translations).

When content is updated (eg you fix a mispelling or add content), WPML again lets you automatically or manually update the affected content. If the content just switched places (eg you reordered some paragraphs), it can even avoid unnecessarily asking you to translate (now you’re glad you didn’t just create a new Word document for each translation).
What’s more, WPML can nicely handle translating content besides just post titles and content, such as: categories and tags, custom fields, and pretty well every aspect of your WordPress site.
But the basics is this: you take care of translating your content using WPML.
Why use WPML and PMB
WPML lets your books and documents created in PMB reach audiences who speak other languages. It can be done quickly and automatically, or methodically and manually, or a mix of both.
When changes are made, it’s easy to pinpoint what text needs to be re-translated. And if the content is contained in both your website and PMB projects (eg a blog post that gets featured in your book), it’s nice to spot exactly what changed and only retranslate that instead of searching through the entire manuscript for the affected content.
How to use WPML and PMB
Here I’m going to walk you through how to use WPML with PMB to create a book in multiple languages.
Get WPML
WPML is a paid plugin which can be purchased and downloaded from their website: https://wpml.org. There is no free version on WordPress.org.
Translate Your WordPress Content with WPML
Install and configure WPML. You’ll choose which languages you intend to translate content into, whether to translate content automatically, and a few other settings. The setup is quite intuitive, but they have a good getting started guide available.
Once it’s setup, use WPML to translate your website’s content.
Create Your Project as Normal
Also, use PMB to create a project, choose and customize its design, add content to it, and edit its metadata, all in your site’s default language.
Ensure Your Project’s Content is Translated
The only special instructions when creating a project is on the content editing step: watch that your chosen content has already been translated. Each item has a flag icon indicating it is fully translated into that language. If a language’s flag is missing, you know that item has either not been translated into that language, or its translations need updating.

If an item has not been translated, hover over it and click the pencil to edit that post. The post’s editing page will open in a new tab. From the post editing page, find the “Language” area in the post’s metadata pane, and add the translations as you normally would with WPML.
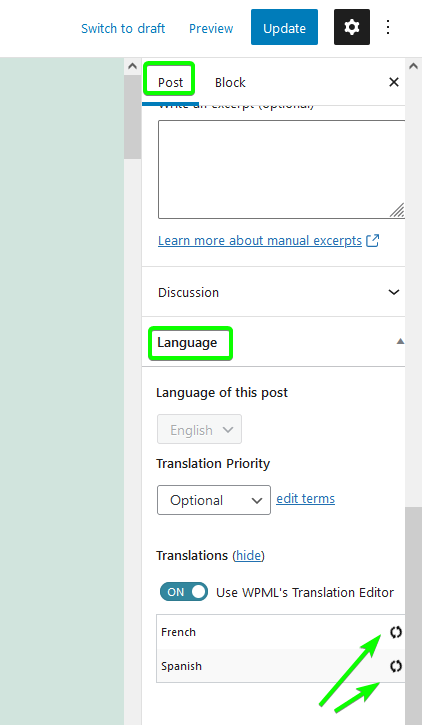

After you have added the translations, close the post editing page’s tab. The item on the project editing page will reflect this change next time the page is loaded.
Generate Your Project in Your Desired Languages
The “Generate Print Page” step is where you generate the project’s contents and select which language.
Notice that with WPML active, a new “Language” dropdown appears towards the top of the page. When you change it to a language besides your primary language, options to translate the project’s metadata and designs will appear.

Make sure to translate the project’s metadata and designs before generating its content. Examples of project metadata include its title and subtitle. Designs often include text used for automatically added footnotes which should also be translated. (Designs currently have a lot of other information, like its title and content, which don’t appear in the generated projects. WPML does require you translate this, but don’t worry about its accuracy as only you will see it. This is expected to be improved in upcoming updates.)
After you translate the project’s metadata and designs, make sure to wait until the update spinners disappear (usually less than a minute). Those indicate WPML is processing the translations. Generating your project’s print page before the translations have finished can result in content not being translated, or in an error.
After generating the print page in a particular language (eg French), return to this generate step and select a different language to then generate the project in another language (eg Spanish). Don’t worry: your translations of the project metadata and designs in the former language (eg French) will be preserved for next time you generate the project in that language.
Update the Content and Retranslate
It is expected you will later update your project’s contents and will need to then re-translate those items. If you have set WPML to not automatically translate all posts, here’s how to find what content needs re-translating.
- Go to your project’s “Edit Content” step
- scan through all the items in your project and find any that are missing a flag
- hover your mouse over them and click the pencil to edit the post (a new tab will open on the post’s editing page)
- use the post’s “Language” pane to update the translations
- when done and you’ve saved the translations, close the tab
You will then return to the project’s editing step. Your newly-added translations will be shown next time you refresh this page (but remember WPML may be processing the changes for a minute or two, in which case you may need to refresh the page again.)
What About Having More Than One Lanugage in a Book at a Time?
What if you want to include posts from multiple languages in the same project? Eg, you may want an English, French, and Spanish version of a post included in the same printing of a book. Is this possible?
It’s possible to include particular translations of posts from particular languages, but there is a drawback: the project’s metadata and the design are in your site’s default language. You will probably want to choose footnotes and page reference text that will work for any language (eg instead of saying “See page 13” for the design’s page reference text, just put “13”).
To get items from particular languages into the same project:
- go to your project’s Edit Content step
- click “Show Filters”
- notice the new “Language” dropdown at the top. You can switch it to a particular language, or even set it to “All Languages”
- when you close the filters, only posts matching your requested language will be shown

But again, if you just want to provide different translations of a project, just add items from your site’s default language to your project, and then choose a language to generate on the final Generate Print-Page step.